Visar inlägg med etikett Photo tips. Visa alla inlägg

lördag 29 augusti 2015

Photo tips: More about shutter speed

Hello readers! Almost a month ago I posted a photo tips about light. That post involved three key things to the right lighting: aperture, shutter speed and ISO speed. In that post I was very short and just went over the basic facts that is needed to be able to change the lighting in your photos. Now I wanted to go back and add some information, this time about the shutter speed. I also want you to know that on all of the example photos the only thing I've changed is the shutter speed, no ISO speed, nothing. All photos are also unedited except for me putting the logo on.

Previous tips:
Photo tips: light - aperture, shutter speed and ISO speed
Photo tips: White balance (WB)

What is shutter speed?

I got over this pretty good in the previous post but in case you haven't read it I'm just going to tell you shortly but I really recommend you reading the previous post if you want to know more.

Shutter speed is how long you shutter is open. An example of how it's measured could be something like this: 1/30 (one thirtieth of a second), 1/100 (one hundredth of a second), 1/400 (one hundredth of a second). A high number like 1/1000 freezes the photo fast and gives you a sharp photo of something moving. The slower something moves, the lower shutter speed you need in order to get it sharp. Anything below 1/60 probably will get a slight blur if you don't use a stative of some kind. When your shutter is open longer it lets in more light and you photo will get lighter.

Shutter speed double

In most cases your shutter speed will most likely double when you choose a higher number. That means that the amount of light you photo gets also doubles. It is not exactly doubling but it's very close so don't think too much about numbers like 1/125 coming after 1/60. For example: 1/30, 1/60, 1/125, 1/500.

If you look at the example photos below you will probably notice that they both are pretty grainy. That is because of the high shutter speed I used. Nothing was moving in this photo, so there was no reason for me to have a high shutter speed but I wanted to show a good example.


1/2500
1/1000


1/400
1/800


To freeze or not?

When you look at a moving motive you have the choice to freeze it or not. Water is something that could look very good when it isn't completly sharp because that gives you the ability to see the movement of the water. The same thing goes for a busy street where it might be nice to see the people move. On the other hand you might want to freeze a player at a sport event or something like that.

Something you have to have in mind is that if you are going to take photos in an area with bad lighting you might need to use flash or lamps if you want to use a high shutter or it might turn out very dark. The same goes for the opposite, maybe the lowers shutter speed isn't good in sharp sunlight because your photo might turn out overexposed.

If you look at my photos below you can see that there are more raindrops in the photo with the higher shutter speed. This is because in the photo with the lower shutter speed all the smaller raindrops got blurry so the camera wasn't able to catch it. The 1/2500 photo is also slightly brighter.

1/4000
1/2500


tisdag 21 juli 2015

Photo tips: Light - aperture, shutter speed, ISO speed

Hi there! In this part I'm going to talk about how to get the perfect light by putting together aperture, shutter and ISO speed. I've put a little cheat sheet in the summary with an example of when these three things work good together but every photo can be different so read and see how you can get the light in your photo exactly as you want it! I also say a few things about DOF because it's also something that you change with aperture.

Aperture

In most cameras you will see what aperture you are using on the display. It's most of the time an 'f' before a number. You might see it like f8 or with any other number. Aperture is the thing that decides how much or little light your sensor gets. It does this by covering an area of your lens. A high f-value (or aperture value) covers less of your lens than a lower f-value.

The f-value is measured in the following numbers: 1 1,4 2 2,8 4 5,6 8 11 16 22 32

Most cameras analyses the lighting and gives you an example of f-value that it thinks might work well, but it might not always work. Aperture can make your photos overexposed or underexposed because it's controlling the amount of light your sensor gets. Because of this, you might need to know how the numbers work. It's pretty simple: every time you move a number higher (to the right) your sensor will get half the amount of light it had at the previous number.

Depth of field (DOF)
There is two kinds of DOF. Small DOF (shallow focus), this gives you a blurry background and/or foreground and makes the motive "pop". Big DOF (deep focus) is usually used in landscape photos, the whole photo is sharp from foreground to background. You change DOF by changing your f-value according to the following rules:

→ A big f-value gives a small DOF
→ A small f-value gives a big DOF

Using f11
Using f4


Shutter speed

Shutter speed is basically how long time your cameras shutter is open. You can probably find this in the display, it looks like the number one divided with another number. Example or shutter speed is 1/30 (one thirtieth of a second), 1/100 (one hundredth of a second), 1/400 (one hundredth of a second). There is a lot of different shutter speeds.

A fast shutter speed will freeze your photo fast. It's good to use a high shutter speed if you want a sharp photo of a sport, something falling or anything moving that you want to be sharp. Lower shutter speed can be used if you for example want to take a photo in a crowded street and want show the peoples movement: instead of freezing them in a step and get a sharp photo of them you will see them more like a blurred line of movement.

Using 1/800
Using 1/1200 (with flash)


ISO speed

When you use a high ISO your camera get more sensitive to light. A high ISO is therefore preferable when it's darker but if you use a too high ISO your photo might end up overexposed. When you use a high ISO your photo might also end up noisy or grainy. You would probably want to keep your settings to the lowest ISO possible, especially if you don't use a stative in a dark area.

A higher ISO will make your shutter speed longer and as you already know that can make your photo blurry if something moves. You will have to remember that even if you have a motive that doesn't move and some form of stative you can't just stop caring about your ISO. It can still get under- or overexposed or grainy so remember to keep an eye on your ISO.

Using ISO 800
Using ISO 400

torsdag 25 juni 2015

Photo tips: White balance (WB)

Hi there! This is the first post in a series of photo tips. I hope you will enjoy it and find it helpful. To write this post I spent quite some time putting together the right content and testing out with different photos. I would really appreciate feedback on this so I know if it was worth the effort or not so please email, comment or like to let me know if I should continue! :)

What is WB?

WB decides how the colours of your photo is going to look. With different WB's the colours change a little, this is to make the colours of the photo to remain natural. WB need to change the photos colour because different lighting have a slightly different colour. When the lighting changes colour the reflection of objects change which gives the photo a colour change if you don't have the right WB. The colours are controlled by the warmth of the light source and that is measured in Kelvin.

How to change WB

If you would like to manually change your WB it can be done with almost every SLR and the setting is found in the menu. To be able to change the WB your camera might need to be set at a manual setting.

When you change WB you will most often be able to choose it by names like "cloudy", "daylight", etc. But you can also chose WB by the kelvin temperature you put in yourself at "custom WB setting". If you can't change your WB it's most likely put on a automatic mode where the WB is changed by the camera itself.

To have your WB at a auto mode can be good because it's easy to just take some quick photos. It works good most of the time but if you move around your motive you can end up getting photos that vary in colour because your camera might have used different (and maybe not always the right) WB. This also tend to not work very well indoors when the lighting is more yellow.

What WB is right when?

Sometimes it can be hard to get the right WB. If you are unsure if you are using the right WB try and focus on something in the photo that you know should be white or grey. If the colour you see in the photo isn't white/grey chances are that you are using the wrong WB. Try and use the setting with the right name for the situation as you see in the picture above. Or you could just use the picture to the right and experiment by yourself.

It's also good to remember that you should try and put your WB after where your motive are and not where you are. To give an example: You are outside and it's full sunlight where you stand so you put your WB on daylight. The motive you are taking photos of is standing in the shadow of a tree. Your photos get colour cast because you didn't put the right WB according to the motive. Maybe try "shade/cloudy" instead? If it's still not working you can try and use "custom WB setting" until you get a good result. Remember that it's hardest to avoid colour cast when you are in the yellow/red zone on the photo to the right.

Colour cast

When you use the wrong WB you will get a colour cast. You can see it by looking at parts of the photo that should be white/grey as I told you about above. A colour cast causes the photo's colour to change tone. Sometimes to a yellow tone, sometimes to a blue tone, etc. But a colour cast doesn't always have to be bad. If you change your WB carefully you can, to give an example, change a photo with a cold tone to a more inviting warm tone. If it's done right, a colour cast have the ability to improve a photo so try and take many photos with different WB (if you don't want to edit it afterwards), maybe you will like the result with a little bit of colour cast better?

The original photo - a bit too cold in my opinion.
The edited photo, a bit warmer with a filter of red.


Undo colour cast

To get an unwanted colour cast undone isn't that hard. Most of the time it's quite simple, all you need is to know a little about the colour wheel. What you need to do in order to undo a colour cast is to naturalise the "wrong" colour by adding a layer of it's complementary colour. As you can see in the photo below the complementary colour is the one on the opposite side in the wheel - blue and orange, red and green, yellow and purple, etc.


Examples with blue

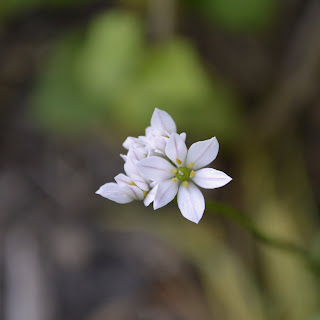
This photo of the flowers tuned out looking a bit blue because I took the photo with a too high WB. The complementary colour to blue is orange in the colour wheel so I put on a yellow filter and the flowers now look white as they should.


Example with yellow

I took this photo some months ago, it's shoot indoors with very little natural light because it was late in the evening. Using the same method as above I put on a purple filter and things looked better. The filter I used was not very strong so I ended up putting on another filter in order to get rid of the last yellow.


Summary

So let's end with a short summary of this post: Cameras use WB to make the colours of the photo look right whether you are out in the sunlight or inside with electrical light. You can (and should) change the WB according to your motives location. This can be done manually but most cameras also have a setting where the camera itself automatically change WB according to what it find right. If you use the wrong WB your photo will get a colour cast, sometimes that's a bad thing and sometimes not. A colour cast is basically when a photo has an offset to any other colour. Old photos can naturally get colour casts as well, especially if they are exposed to much sunlight. You can undo a colour cast by using the complementary colour in the colour wheel.